THE CHARACTER SHEET METHOD
One photo of your face, one prompt, and you get a full character sheet: the same identity, the same look, the same DNA in every video you generate from it. The exact prompt and settings I use are below.
Want to skip the learning curve and learn directly from me?
I build AI clones for business owners who never want to record again — and this sheet is the first thing we create together. Want me to build yours?
Apply to work with me →Instagram — @nicola.aiWhen you generate AI videos of yourself, the model reinvents you a little every time: the face drifts, the hair changes, the outfit is never quite the same. That is what makes a clone look fake.
A character sheet fixes it. It gives the video model one canonical reference for your identity — face, hair, body proportions, outfit, accessories, colors — so consistency, DNA and look stay coherent across the whole video, and across every video after it.
I wrote a single prompt that works for every face. You do not have to write anything: copy it, paste it, add your photo. That is the whole method — and it is new, and it works.
Copy the prompt
It is below, with a Copy button. Do not edit it.
Add one photo of your face
Upload it as the only reference, set the settings shown here, generate.
Use the sheet in every video
From now on the sheet is your identity reference. Every clip starts from it.
What a Character Sheet Is
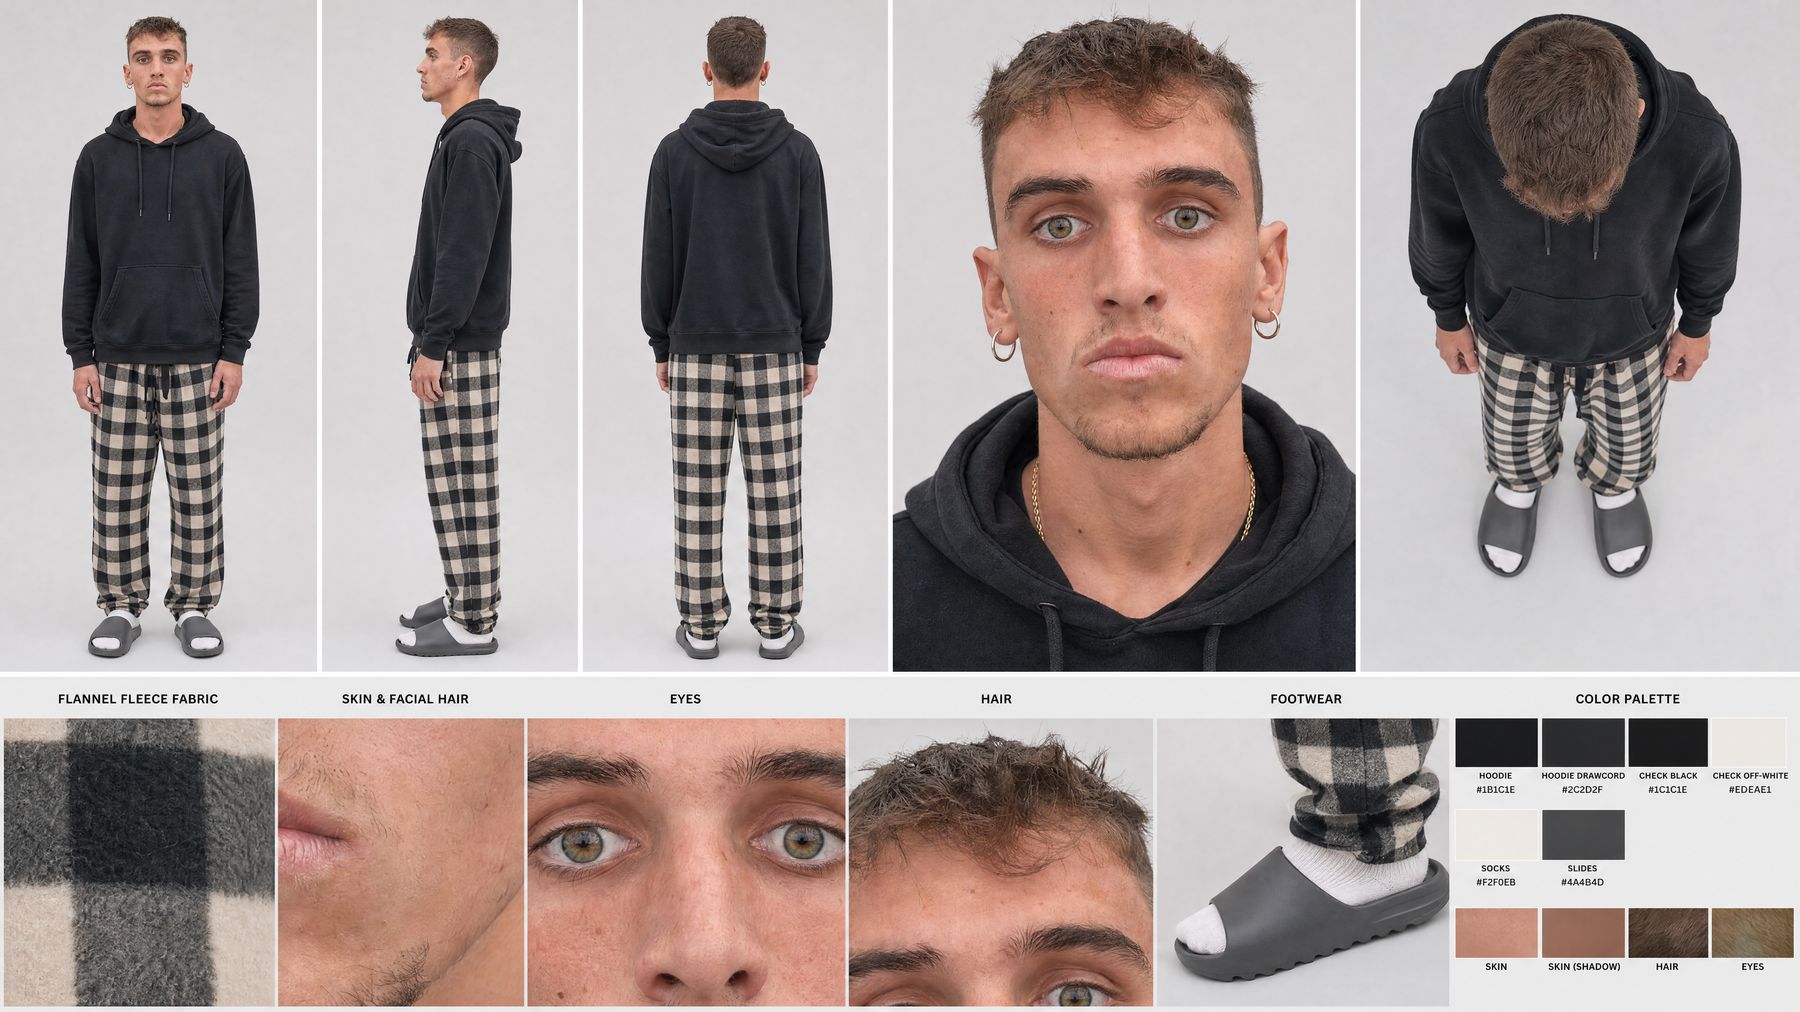
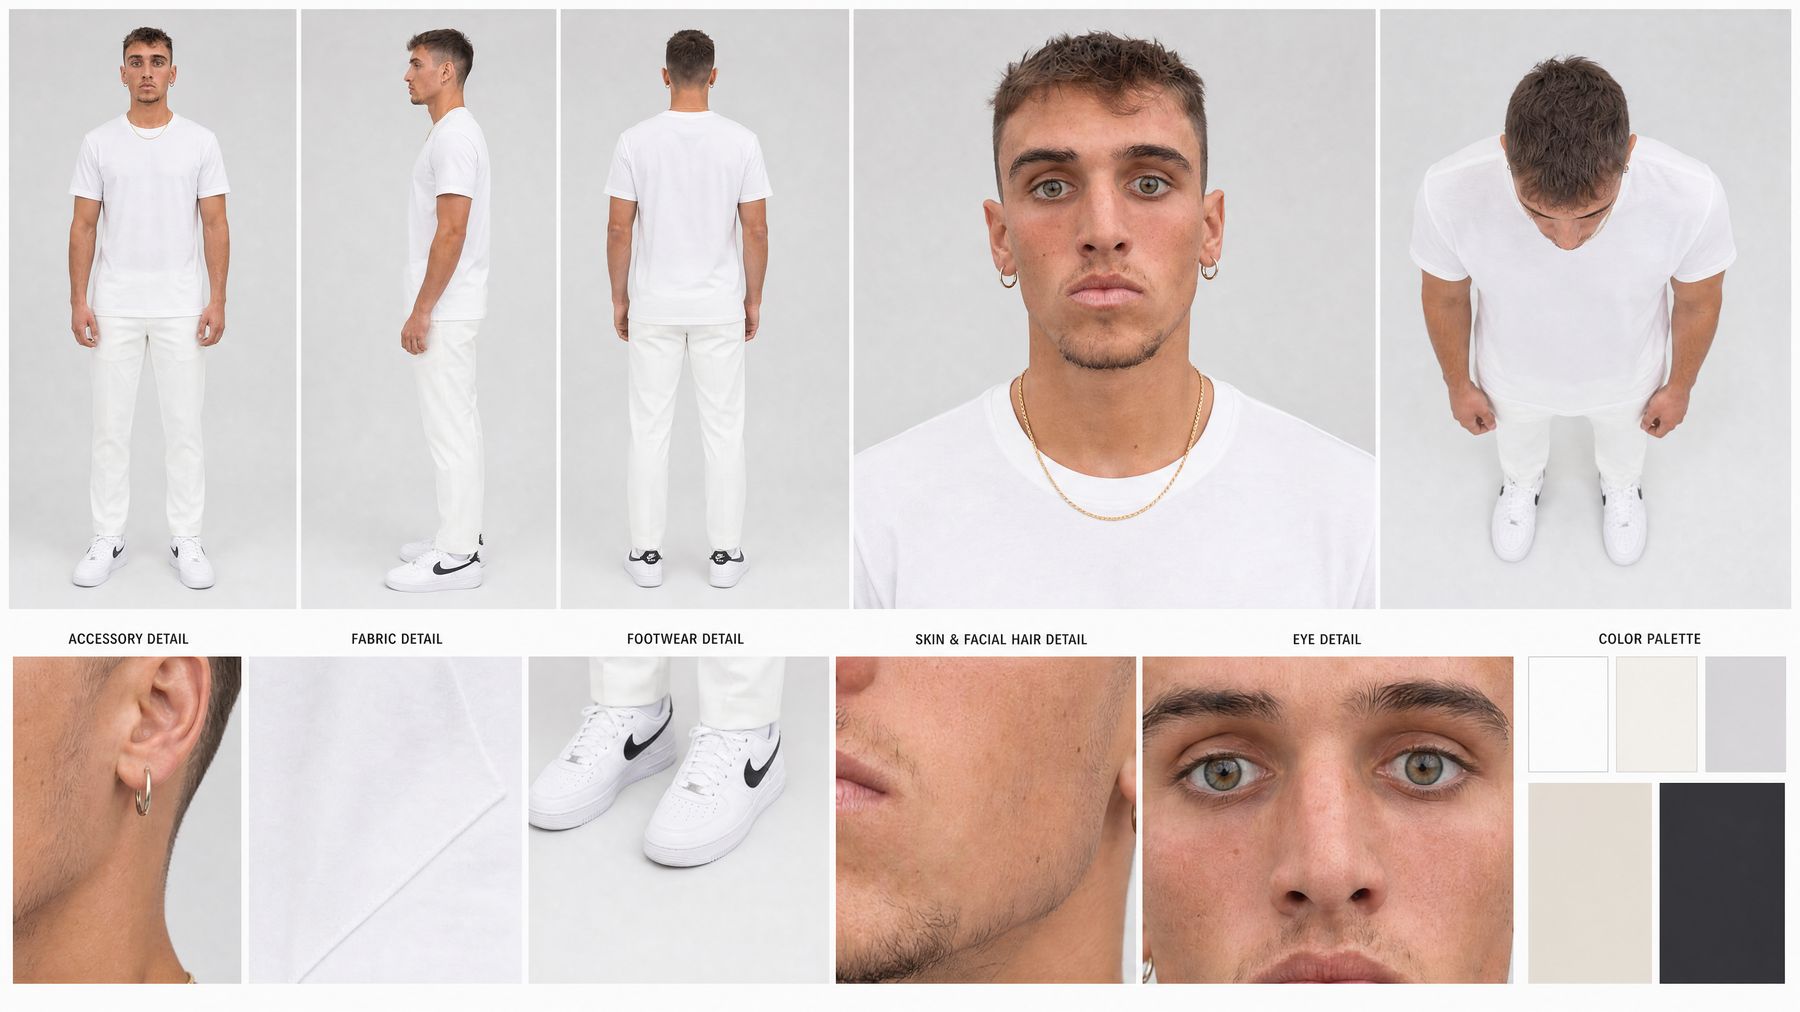
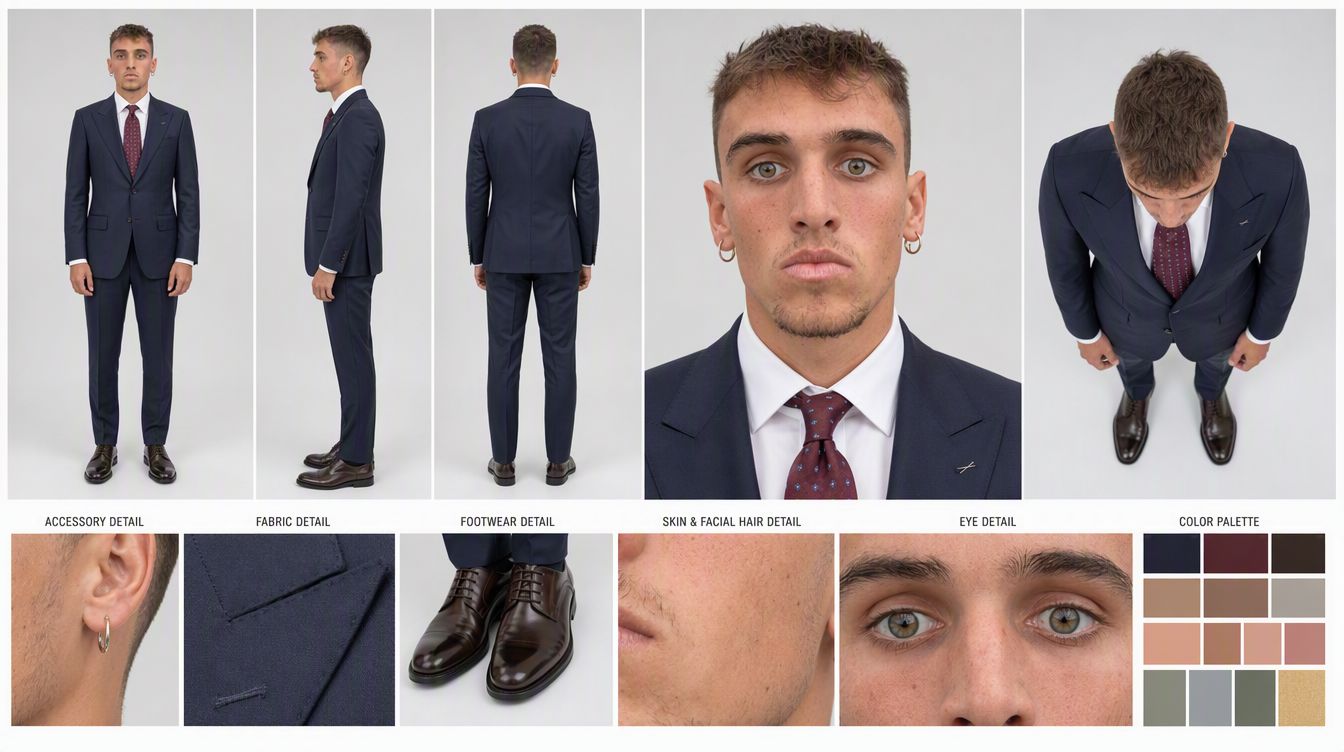
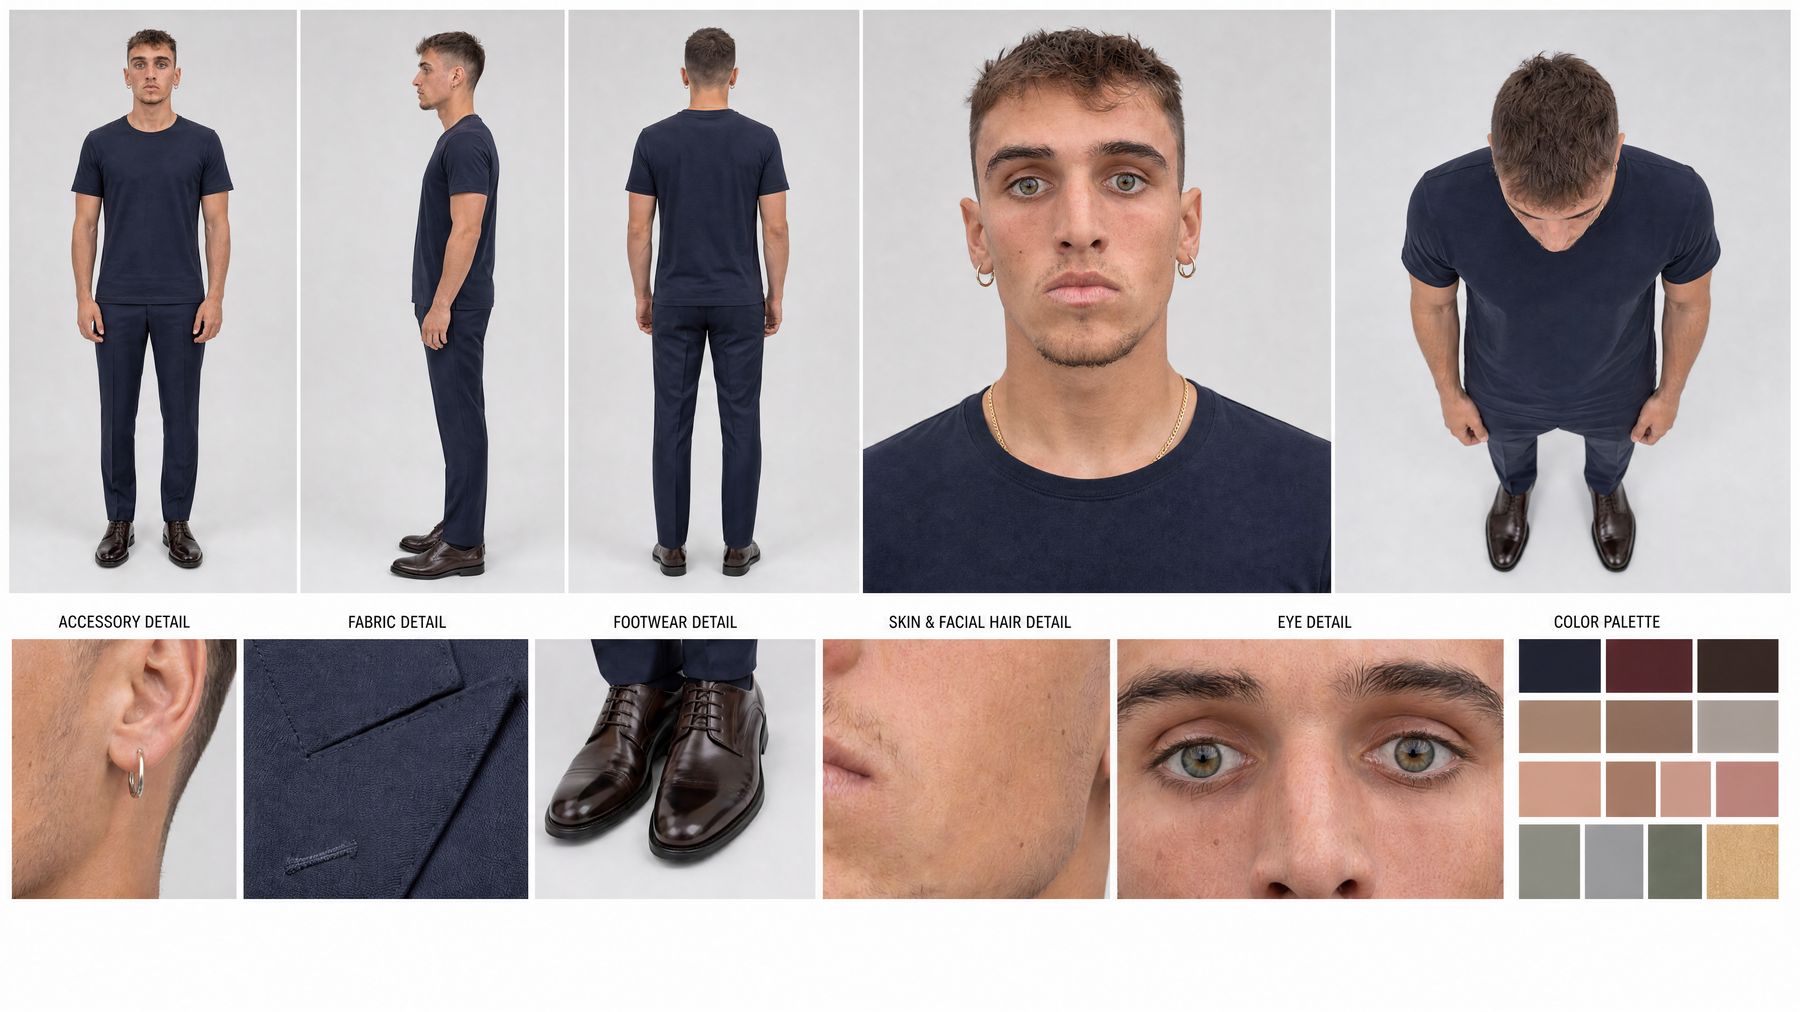
A single 16:9 board that shows the same person from every angle, plus the details a video model needs.
A character sheet is not a portrait. It is a reference board built for one job: locking your identity so the model can reproduce it. The prompt below produces exactly this layout every time.
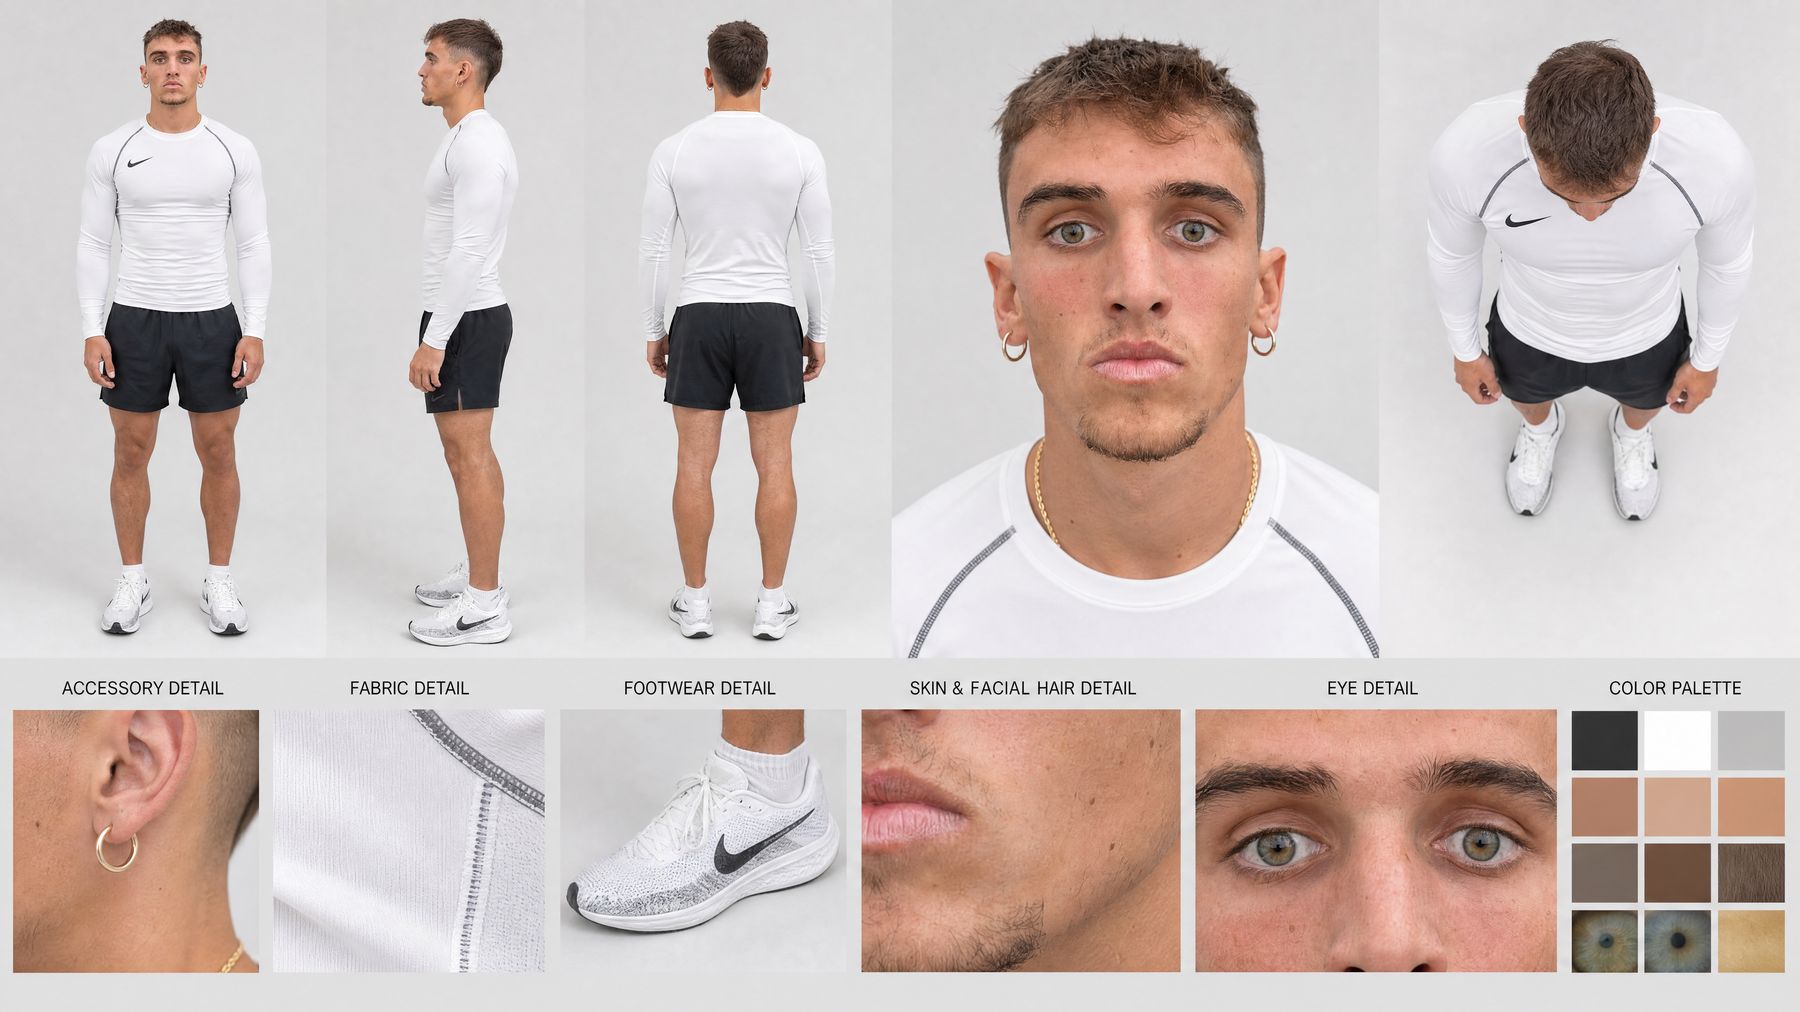
The panels, and why each one exists
Front, side and back full-body views
Three straight views of the entire figure, head to toe. They give the model your proportions, posture and the exact outfit from every angle.
Large frontal face portrait
The biggest panel on the sheet. Direct eye contact, neutral expression, real skin texture: pores, micro-wrinkles, individual eyebrow hairs, facial-hair strands. This is the identity anchor.
Top-down view
Looking vertically down on the head and shoulders. It shows the top of the hairstyle and how the outfit sits — the angle video models get wrong most often.
Macro detail row
Accessory, fabric, footwear, skin and facial hair, eyes. Each one is a close-up the model can copy instead of inventing.
Color palette
Clean swatches sampled from your real outfit, skin, hair, eyes, accessories and footwear. Exact color information, so nothing shifts between generations.
The sheet is deliberately neutral. It is about physical identity, proportions, wardrobe and materials — not acting. Emotion comes later, in the video prompt.
Why It Works
The video model stops guessing. Identity, DNA and look stay coherent through the whole video.
Consistency across the whole video
Every shot, every angle, every cut references the same sheet — so the face in the last second matches the face in the first.
Your DNA, not a lookalike
Face structure, skin tone, eye color, hair texture, facial hair, age and body proportions are all on the sheet. The model has no gap to fill with an invented version of you.
The look is locked
Outfit, footwear, accessories, materials, logos and colors are documented once. They come back identical in each generation.
This is how I produce my own content and my clients' content without recording. One sheet per outfit, reused in every video.
The Settings I Recommend
Two settings. Use exactly these.
The sheet is a horizontal board: five views on top, six detail panels below. Any other ratio breaks the layout.
The Character Sheet Prompt
One prompt for every face. Copy it as it is.
Use the provided subject reference image as the absolute identity and appearance reference, preserving the subject’s exact facial structure, skin tone, eye color, hairstyle, hair texture, facial hair, body proportions, age, outfit, footwear, accessories, materials, colors, logos, and every recognizable visual detail with extremely high consistency across all panels. Create a professional photorealistic character reference sheet that follows the exact visual composition, panel hierarchy, shot selection, crop logic, detail coverage, spacing, and photographic presentation of REFERENCE 1. Use a clean 16:9 horizontal canvas with a seamless very light grey studio background, subtle natural floor contact shadows, soft neutral diffused studio lighting, realistic RAW photographic rendering, and identical color balance across every image. Across the upper section, show the same subject in five specific reference views arranged from left to right: first, a straight-on full-body front view with the entire figure visible from head to toe, arms naturally relaxed at the sides and neutral posture; second, a strict full-body 90-degree side profile showing the complete silhouette from head to toe; third, a straight-on full-body back view showing the exact rear appearance of the hairstyle, outfit, body proportions and footwear; fourth, a significantly larger tight frontal face portrait occupying more visual space than the body views, cropped approximately from the upper chest to slightly above the head, with direct eye contact, neutral relaxed expression, extremely accurate identity, realistic pores, micro-wrinkles, peach fuzz, individual eyebrow hairs, facial-hair strands, natural lips and detailed eyes; fifth, a high overhead top-down view looking vertically down onto the subject’s head and upper body, clearly revealing the top of the hairstyle or headwear, shoulders, arms, footwear positioning and outfit from above. Do not introduce expression studies or alternate emotional portraits: the sheet is focused exclusively on physical identity, proportions, wardrobe and material details exactly as in REFERENCE 1. Across the lower section, create a horizontal row of dedicated macro-detail panels extracted from the subject’s actual appearance: one close-up dedicated to the most distinctive headwear, hairstyle, logo or accessory detail; one extreme macro of the main garment fabric showing weave, stitching, folds and material texture; one isolated close-up of the footwear showing shape, construction, leather or fabric texture and realistic reflections; one extreme close-up of facial skin and facial hair showing pores, beard or stubble density, skin texture and individual hairs; one extreme close-up centered on both eyes showing exact iris color, eyelashes, eyebrow texture, catchlights and surrounding natural skin; and at the far right a compact color-palette panel containing clean rectangular swatches sampled directly from the subject’s real outfit, skin, hair, eyes, accessories and footwear. Place concise uppercase technical labels above the lower detail panels in the same restrained sans-serif editorial style and positioning as REFERENCE 1, adapting each label to the actual characteristic being displayed. Maintain generous spacing, precise alignment, clean visual hierarchy and the same premium character-development-board aesthetic as REFERENCE 1. Every panel must depict the exact same person with identical identity, grooming, outfit and proportions, while each shot serves a different practical reference purpose: front anatomy, side silhouette, rear anatomy, facial identity, overhead construction, accessory detail, fabric texture, footwear construction, skin and facial-hair texture, eye detail and exact color information. Aspect ratio 16:9.
It already describes every panel, the lighting, the background, the labels and the palette. Your photo supplies the identity; the prompt supplies everything else.
How to Run It
Any AI platform with an image tool that offers GPT Image 2.5.
- Open an AI generation platform — Any platform with an image-generation tool works, as long as the model available is GPT Image 2.5.
- Select GPT Image 2.5 and set 16:9 — These are the two settings from the previous chapter.
- Upload one photo of your face as the only reference — A clear, front-facing photo. This single image is your identity reference.
- Paste the prompt and generate — Paste the full prompt above, unchanged. Generate.
- Save the sheet — This is your canonical identity reference. Use it as the reference in every video you generate from now on.
It does not need to be a professional photo. Good light, face clearly visible, no filters. That is enough — the sheet does the rest.
Want a Specific Outfit?
Add one more reference and one line in the prompt.
If you want the sheet in a specific outfit, add a second reference image showing that outfit, and say in the prompt that the subject wears the outfit in reference 2.
The subject wears the outfit shown in reference 2.
Each meaningful outfit becomes its own sheet. Same face, different wardrobe — so every video uses the right state of you.
Real Examples: My Photo, My Sheets
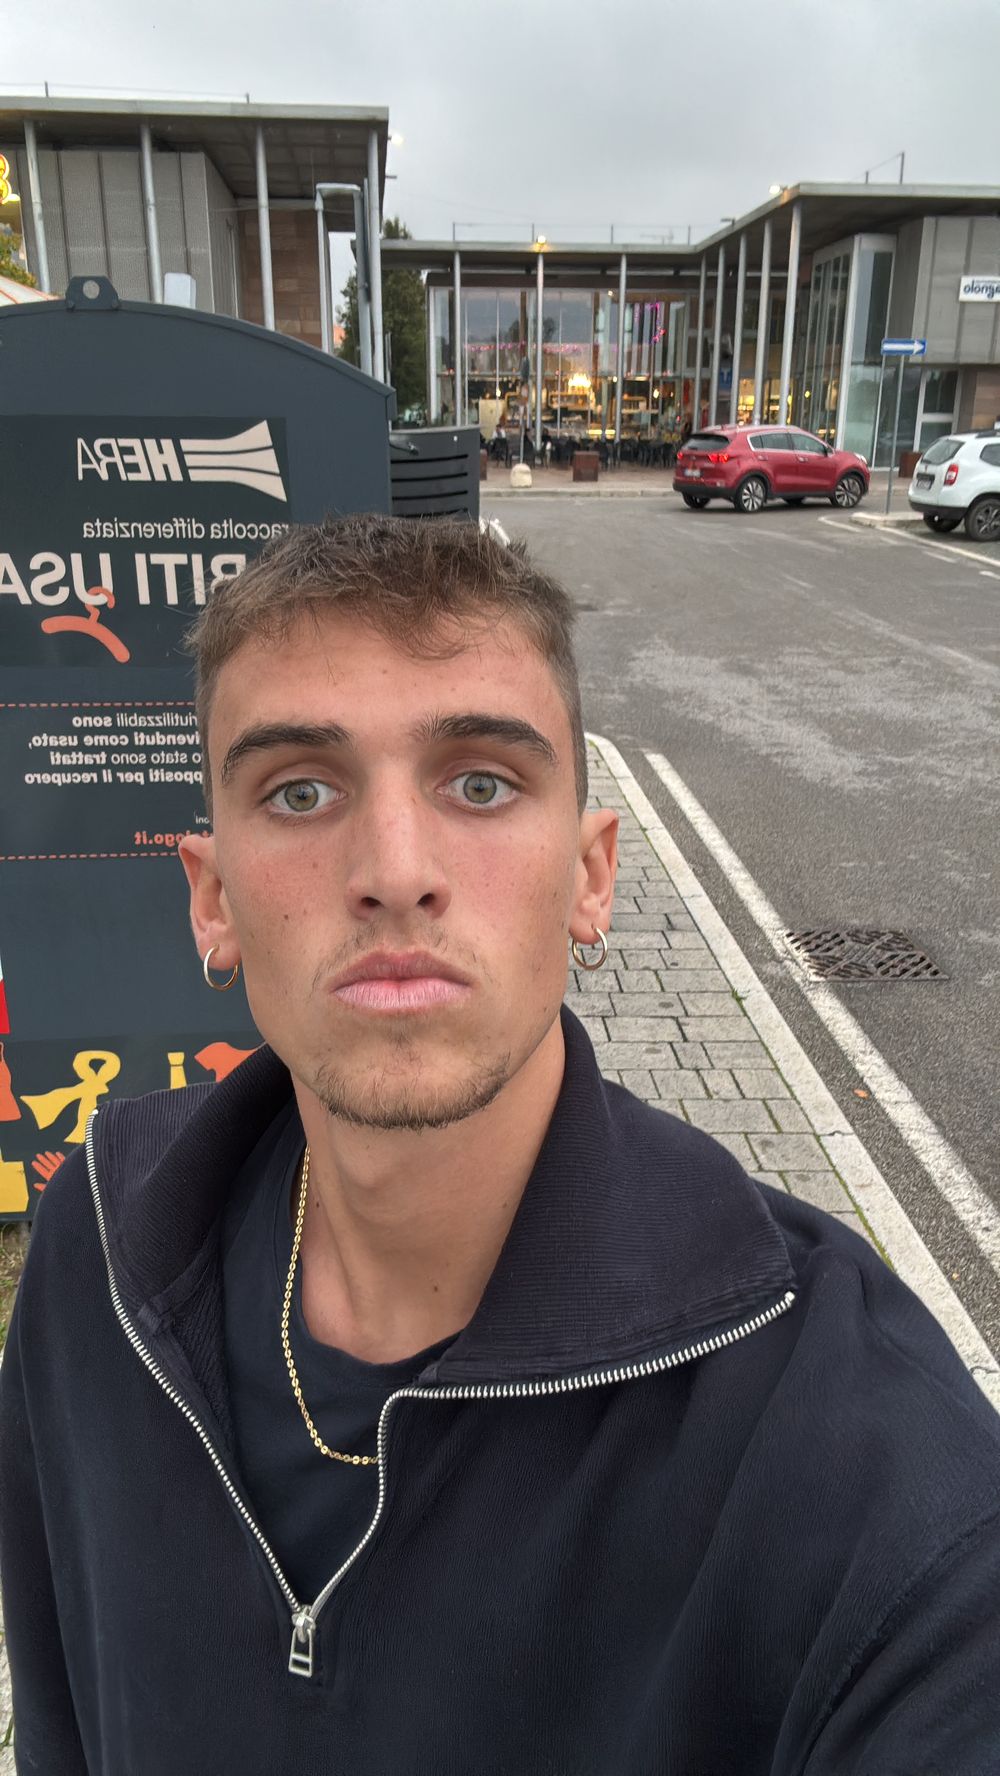
One selfie in. Every sheet out — same face, same eyes, same earrings, different outfit.
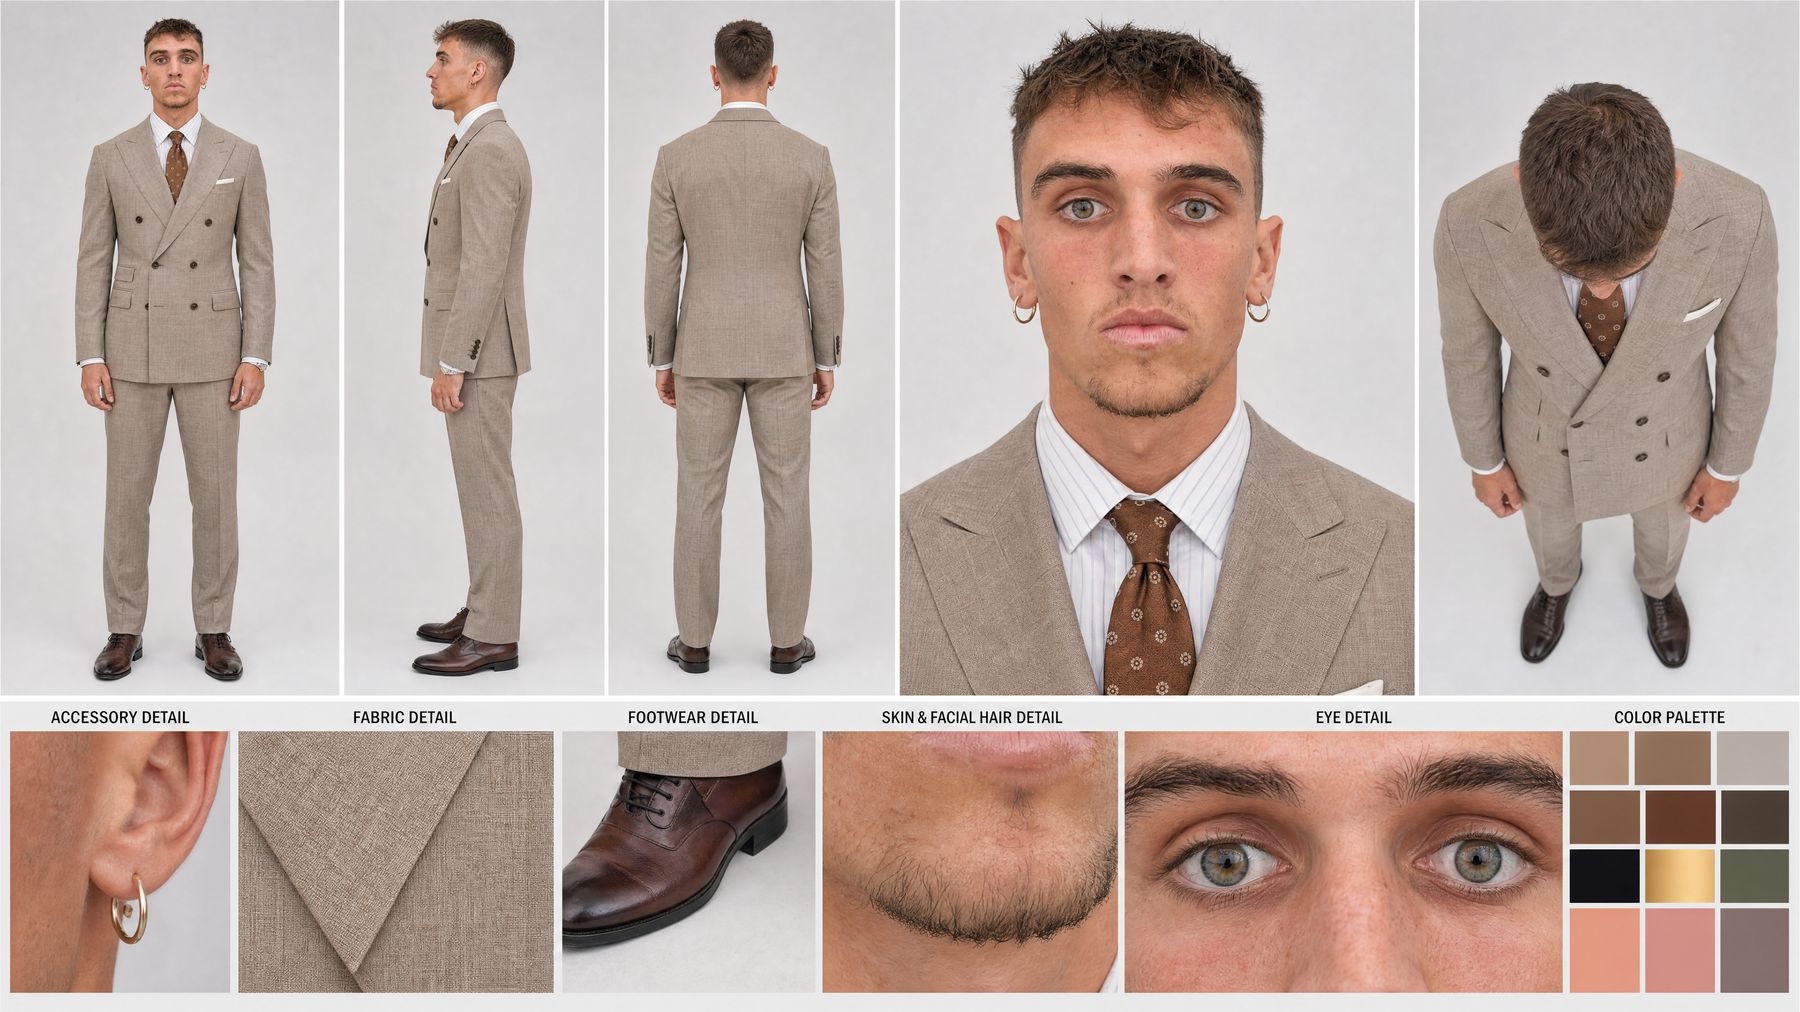
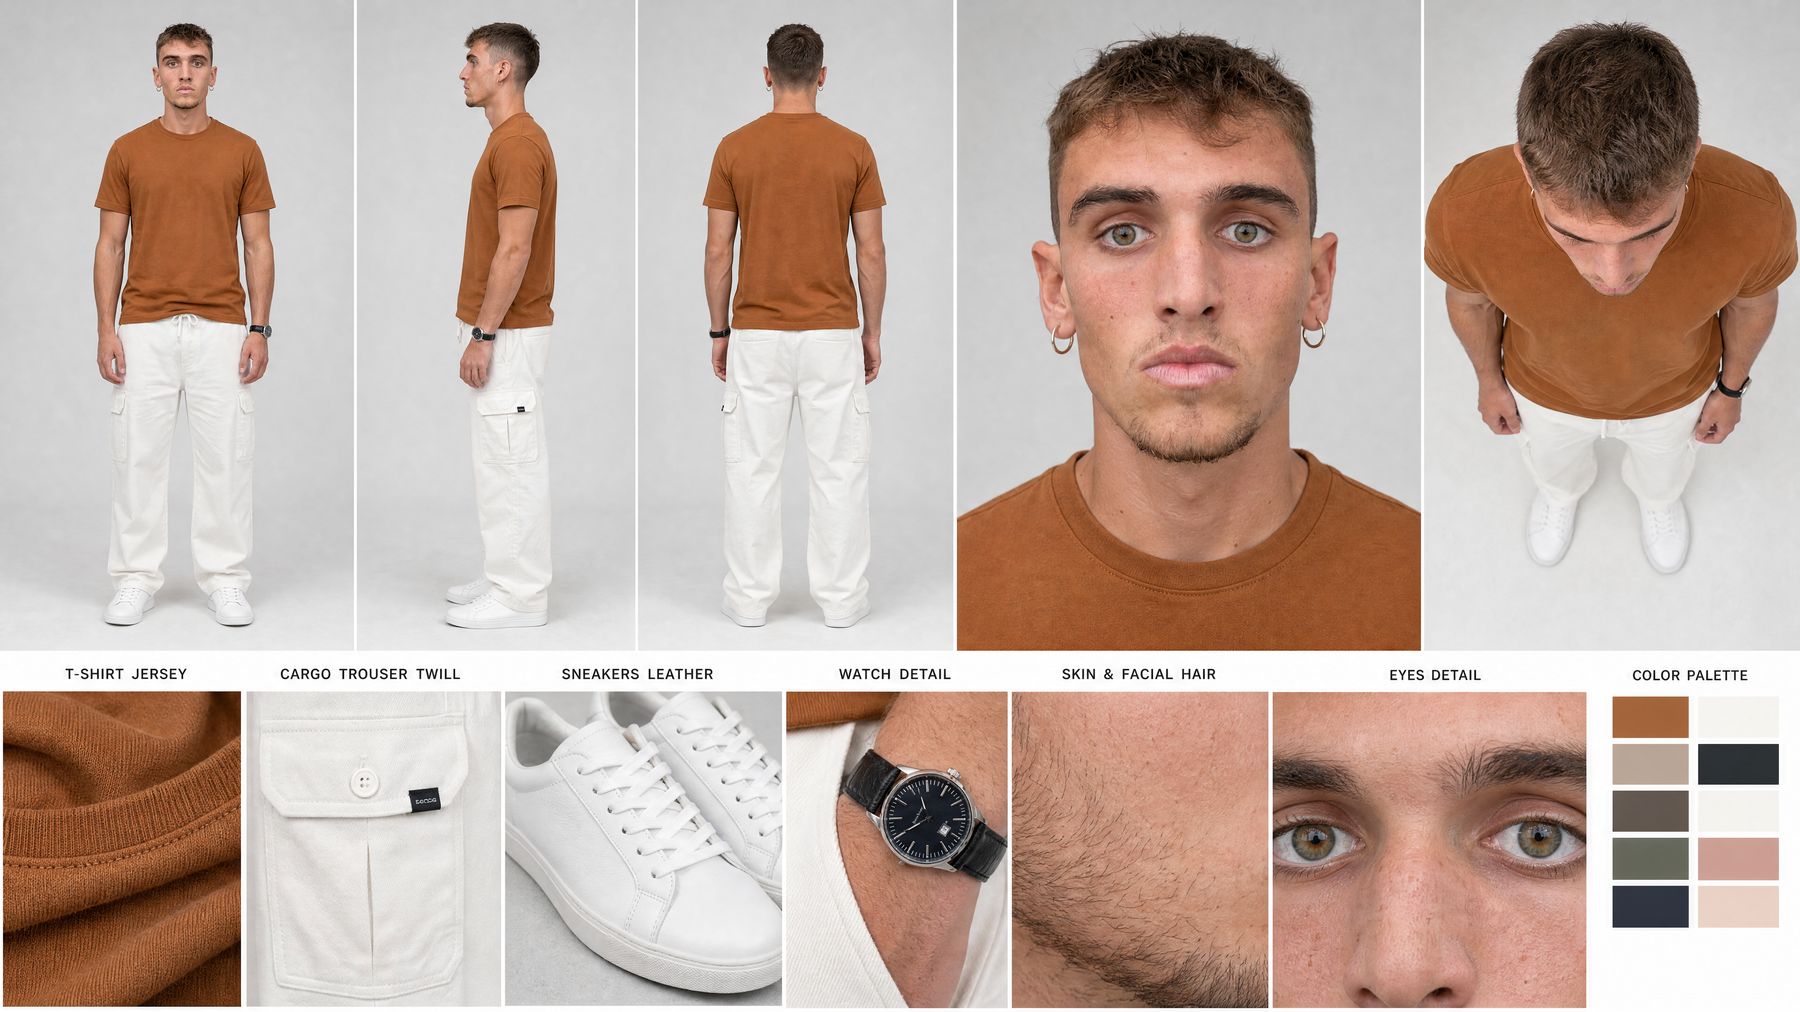
This is the actual input and the actual outputs. Same person on every sheet: face structure, green eyes, brown hair, hoop earrings, stubble — nothing drifts.
More sheets from the same face, with outfit references

One photo. One prompt. One identity.
- Copy the prompt, don't edit it
- GPT Image 2.5, 16:9
- Your face is the only reference
- One sheet per outfit
YOUR PHOTO → GPT IMAGE 2.5 → CHARACTER SHEET → EVERY VIDEO STAYS CONSISTENT
Want to skip the learning curve and learn directly from me?
If you want the whole system — the sheet, the clone, the videos, the content calendar — built with you, 1:1, this is where it starts.
Apply to work with me →Instagram — @nicola.ai